Tooth Coloured Filling
1. Definition
A tooth-coloured filling is a restoration made of composite resin, glass ionomer cement, or other tooth-shaded materials used to restore decayed, chipped, or fractured teeth and improve aesthetics.
2. Indications
Dental caries (especially anterior or visible teeth)
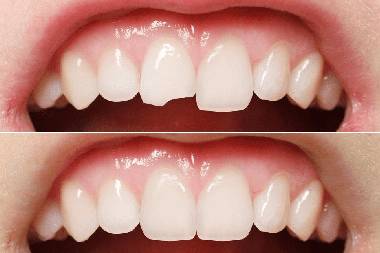
Fractured or chipped teeth
Diastema (gap) closure
Worn-down teeth
Old amalgam filling replacement (for aesthetic reasons)
Minor reshaping or cosmetic improvements
3. Contraindications
Large cavities where durability is more important (amalgam or crowns may be preferred)
Patients with poor oral hygiene
Patients with high caries risk or bruxism (unless reinforced)
4. Types of Tooth-Coloured Filling Materials
| Material | Properties |
|---|---|
| Composite Resin | Most commonly used; aesthetic, strong, bonds well to enamel. |
| Glass Ionomer Cement | Releases fluoride; ideal for non-load-bearing areas. |
| Resin-Modified GIC | Combines GIC with resin for better strength and aesthetics. |
| Compomers | Hybrid of composite and GIC; used in pediatric dentistry. |
| Porcelain Inlays/Onlays | Indirect restorations; highly aesthetic and durable. |
5. Advantages
Natural tooth colour match (aesthetic)
Bonds directly to tooth structure (minimal tooth removal)
Mercury-free (unlike amalgam)
Can be used for cosmetic improvements
Versatile for front and back teeth
6. Disadvantages
Technique-sensitive (requires a dry field)
Can shrink slightly during curing → possible microleakage
Less durable than amalgam for large posterior restorations
May stain over time (especially with coffee, tea, smoking)
Can wear down faster in high-bite-pressure areas
7. Clinical Procedure (Composite Filling)
Step 1: Shade Selection
Choose correct shade before tooth dries out (when enamel is moist).
Step 2: Isolation
Rubber dam or cotton rolls to keep area dry.
Step 3: Cavity Preparation
Remove decay and shape cavity conservatively.
Step 4: Etching
Apply phosphoric acid (35–37%) to enamel/dentin for 15–30 seconds.
Step 5: Rinsing and Drying
Rinse off etchant and gently dry (do not desiccate dentin).
Step 6: Bonding Agent
Apply dental adhesive and cure with light.
Step 7: Placement of Composite
Apply composite resin in increments.
Each layer cured with blue light (LED curing light) for ~20 seconds.
Step 8: Shaping and Finishing
Trim excess material, shape the anatomy.
Step 9: Polishing
Use polishing disks, cups, or paste to smooth and shine the restoration.
8. Post-Operative Instructions
Avoid hard/sticky foods for 24 hours if deep restoration.
Some sensitivity to hot/cold may be present initially.
Maintain good oral hygiene.
9. Longevity
Composite fillings typically last 5–10 years, depending on:
Oral hygiene
Size/location of filling
Chewing habits
Regular dental check-ups